ทำ Proxy Server และระบุ Authentication เข้าใช้งาน Internet
สวัสดีครับ หลังจากหายไปนาน ไม่ค่อยจะมีเวลาเขียนบทความกันเลย.. วันนี้ผมจะมาแนะนำวิธีการทำ Proxy Server และการระบุ Authentication การเข้าใช้งาน Internet เผื่อท่านไหนจะนำไปเป็นแนวทาง หรือทางเลือกครับ


ทั้งนี้ที่ผมเขียนบทความนี้ขึ้นมาก็เพื่อเอาไว้เป็นแนวทาง และกันตัวเองลืมด้วย 555+
วัตถุประสงค์
1. เพื่อเก็บ Log การใช้งาน Internet
2. เพื่อให้สอดคล้องกับ พรบ. คอมพิวเตอร์
เริ่มด้วยการติดตั้ง CentOS7 กันก่อนนะ
หลังจากที่ติดตั้ง CentOS7 เสร็จเรียบร้อยแล้ว ก็ต้องติดตั้ง Package เพิ่มเติม ซึ่งมันก็คือ Service ต่าง ๆที่จำเป็นในการทำครั้งนี้นั่นเอง
Package ที่จะต้องติดตั้งเพิ่ม
1. squid
squid ก็คือโปรแกรม ที่เอามาทำ Proxy Server เราสามารถทำ Access Control เช่น ได้ว่าจะให้ Block Website, Block IP Address, Block Mac Address , Block Internet, Block Bittorrent บลา ๆๆ
2. httpd หรือ Apache Web Server มันคือ Software ที่เอาไว้เปิด Service HTTP และยังรองรับการทำงานใน OS ต่าง ๆ เช่น Linux Server, Windows Server ในที่นี้เราจะนำ httpd นี้มาทำ Authen กัน
มาเริ่มกัน...
เรามา yum squid ก่อนเลย
[root@centos-vm ~]# yum install squid -y
มาเช็คดู Package หน่อยว่าเราติดตั้งละนะ
[root@centos-vm ~]# rpm -q squid
squid-3.5.20-12.el7_6.1.x86_64
ต่อไปติดตั้ง Package httpd
[root@centos-vm ~]# yum install httpd -y
สั่ง Enable Server httpd เพื่อให้ Service run Auto ขึ้นมาเวลาเรา Reboot เครื่อง โดยไม่ต้องมานั่งพิมพ์คำสั่งเปิดทุกครั้ง...
[root@centos-vm ~]# systemctl enable httpd
Start Service จ้า
[root@centos-vm ~]# systemctl start httpd
ถ้าจะเช็ค Status Service httpd ถ้ามัน Active ก็ผ่านจ้า
[root@centos-vm ~]# systemctl status httpd
● httpd.service - The Apache HTTP Server
Loaded: loaded (/usr/lib/systemd/system/httpd.service; enabled; vendor preset: disabled)
Active: active (running) since Thu 2019-08-08 16:11:22 +07; 1h 31min ago
Docs: man:httpd(8)
man:apachectl(8)
Main PID: 1393 (httpd)
Status: "Total requests: 0; Current requests/sec: 0; Current traffic: 0 B/sec"
CGroup: /system.slice/httpd.service
├─1393 /usr/sbin/httpd -DFOREGROUND
├─1640 /usr/sbin/httpd -DFOREGROUND
├─1641 /usr/sbin/httpd -DFOREGROUND
├─1642 /usr/sbin/httpd -DFOREGROUND
├─1643 /usr/sbin/httpd -DFOREGROUND
└─1644 /usr/sbin/httpd -DFOREGROUND
Aug 08 16:11:16 centos-vm systemd[1]: Starting The Apache HTTP Server...
Aug 08 16:11:22 centos-vm httpd[1393]: AH00558: httpd: Could not reliably determine the server's fully qual...ssage
Aug 08 16:11:22 centos-vm systemd[1]: Started The Apache HTTP Server.
Hint: Some lines were ellipsized, use -l to show in full.
ต่อไปเราไปเปลี่ยน Port squid กันก่อน โดยเข้าไปที่ไฟล์ squid.conf
[root@centos-vm ~]# vi /etc/squid/squid.conf
Port Default จะเป็น port 3128 แต่ผมจะเปลี่ยนเป็น port 8080 ครับ
# Squid normally listens to port 3128
http_port 8080
ผมจะใส่ TAG Hostname เข้าไปใน Script squid ด้วยนะ
#TAG Visible_hostname
visible_hostname proxy_server-vm.com
นำ Scripts นี้ไปวางใน squid.conf ครับ
##############Authentication##############
auth_param basic program /usr/lib64/squid/basic_ncsa_auth /etc/squid/.htpasswd
auth_param basic childen 5
auth_param basic realm Squid Basic Authentication
auth_param basic credentialsttl 10 hours
acl password proxy_auth REQUIRED
##########################################
เพิ่ม access allow password เข้าไปใน squid.conf ด้วย เพื่อ Allow ให้กับกับไฟล์ password ครับ
โดยพิมพ์ไว้ภายใต้หัวข้อนี้ใน Script ครับ
#
# Recommended minimum Access Permission configuration:
#
# Deny requests to certain unsafe ports
#########Password Authentication#########
http_access allow password
#########################################
เสร็จแล้วก็ save files squid.conf ครับ
จากนั้น Restart Service squid สักรอบ...
[root@centos-vm ~]# systemctl restart squid
เช็ค status squid ถ้า Active ก็ถือว่าผ่าน
[root@centos-vm ~]# systemctl status squid
● squid.service - Squid caching proxy
Loaded: loaded (/usr/lib/systemd/system/squid.service; disabled; vendor preset: disabled)
Active: active (running) since Thu 2019-08-08 18:17:44 +07; 11s ago
Process: 15399 ExecStop=/usr/sbin/squid -k shutdown -f $SQUID_CONF (code=exited, status=0/SUCCESS)
Process: 15409 ExecStart=/usr/sbin/squid $SQUID_OPTS -f $SQUID_CONF (code=exited, status=0/SUCCESS)
Process: 15402 ExecStartPre=/usr/libexec/squid/cache_swap.sh (code=exited, status=0/SUCCESS)
Main PID: 15410 (squid)
Tasks: 3
CGroup: /system.slice/squid.service
├─15410 /usr/sbin/squid -f /etc/squid/squid.conf
├─15412 (squid-1) -f /etc/squid/squid.conf
└─15413 (logfile-daemon) /var/log/squid/access.log
Aug 08 18:17:44 centos-vm systemd[1]: Starting Squid caching proxy...
Aug 08 18:17:44 centos-vm squid[15409]: 2019/08/08 18:17:44| Unrecognised basic auth scheme parameter 'childen'
Aug 08 18:17:44 centos-vm squid[15410]: Squid Parent: will start 1 kids
Aug 08 18:17:44 centos-vm squid[15410]: Squid Parent: (squid-1) process 15412 started
Aug 08 18:17:44 centos-vm systemd[1]: Started Squid caching proxy.
จบในส่วนของ script squid.conf ตรงนี้
=====================================================================
ทีนี้.. เรามากำหนด Username Password ในการ Login Authentication ให้กับ User กันก่อน
ก่อนอื่น สร้าง Folder .htpasswd พร้อมกับสร้าง user1 เพิ่มเข้าไป และกำหนด Password
[root@centos-vm ~]# htpasswd -c /etc/squid/.htpasswd user1
New password:
Re-type new password:
Adding password for user user1
หลังจากสร้าง Username เสร็จแล้ว ก็ลองมาเช็ค User ที่เราได้สร้างได้ที่ path นี้
[root@centos-vm ~]# cat /etc/squid/.htpasswd
user1:$apr1$EDeuhog6$oTUHPft3R.yNOIhqZcvg5/
ถ้าจะเพิ่ม User เพิ่ม ก็ใช้คำสั่งตามนี้
[root@centos-vm ~]# htpasswd /etc/squid/.htpasswd user2
=====================================================================
มากำหนด Firewall กันก่อน!
ตอนนี้เราตั้งค่า squid และ Authen เรียบร้อยแล้ว แต่ยังออก Internet ไม่ได้ครับ ต้องไปเปิด Port ที่ Firewall-cmd กันก่อน
มาเช็ค script firewall กันก่อนครับ
[root@centos-vm ~]# firewall-cmd --zone=public --list-all
public (active)
target: default
icmp-block-inversion: no
interfaces: ens33
sources:
services: ssh dhcpv6-client
ports:
protocols:
masquerade: no
forward-ports:
source-ports:
icmp-blocks:
rich rules:
ทีนี้เราต้องมาเพิ่ม Port Service เข้าไปใน firewall ครับ
Port แรกที่เราจะ add เข้าไปคือ Service squid
[root@centos-vm ~]# firewall-cmd --zone=public --add-service=squid --permanent
success
ทีนี้เข้าไปดูไฟล์ service squid แล้วให้ทำการเปลี่ยน port จาก 3128 เป็น 8080 (ต้องให้เหมือนกับตอนที่เราไปเปลี่ยนใน squid.conf นะ)
[root@centos-vm ~]# nano /usr/lib/firewalld/services/squid.xml
<?xml version="1.0" encoding="utf-8"?>
<service>
<short>squid</short>
<description>Squid HTTP proxy server</description>
<port protocol="tcp" port="8080"/>
</service>
Service ต่อไปที่จะไปเปิดคือ http(port80) และ https(port443)
[root@centos-vm ~]# firewall-cmd --zone=public --add-service=http --permanent
success
[root@centos-vm ~]# firewall-cmd --zone=public --add-service=https --permanent
success
add masquerade เพื่อให้เครื่องลูกข่ายออก Internet ได้
[root@centos-vm ~]# firewall-cmd --permanent --zone=public --add-masquerade
Restart firewall-cmd สักรอบ
[root@centos-vm ~]# systemctl restart firewalld
เช็ค status firewall-cmd ถ้า Active ก็ผ่านครับ
[root@centos-vm ~]# systemctl status firewalld
● firewalld.service - firewalld - dynamic firewall daemon
Loaded: loaded (/usr/lib/systemd/system/firewalld.service; enabled; vendor preset: enabled)
Active: active (running) since Thu 2019-08-08 18:32:45 +07; 2min 55s ago
Docs: man:firewalld(1)
Main PID: 15624 (firewalld)
Tasks: 2
CGroup: /system.slice/firewalld.service
└─15624 /usr/bin/python -Es /usr/sbin/firewalld --nofork --nopid
เป็นอันเสร็จ ของการตั้งค่า squid และ Autentication
ทีนี้.. เรามาลองเทสกัน
ไปที่ PC จะเป็น Linux Desktop หรือ Windows ก็ได้ครับ
ในที่นี้ผมจะใช้ Windows 10 ผ่าน Vmware ทำ Bridge mode ตั้ง IP อยู่วงเดียวกันกับเครื่อง PC และ Proxy Server ครับ
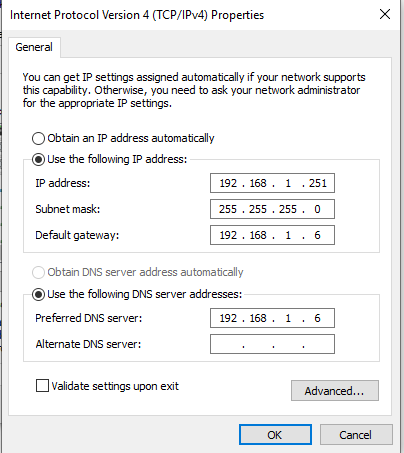
ตั้งค่า Static IP
IP address : 192.168.1.251
Subnet mask : 255.255.255.0
Default gateway : 192.168.1.6 (Gateway ของเครื่อง CentOS7 ที่เราที่เราทำ Proxy Server นะครับ)
Preferred DNS Server : 192.168.1.6 (ผมใช้ IP Proxy เลย จะได้เรียกจาก Cache files ได้เลย)
*จริง ๆ แล้วยุคนี้ไม่จำเป็นต้องพะวงเรื่อง Internet กันแล้วล่ะครับ ไม่จำเป็นต้องใช้ Proxy แล้วด้วยสมัยนี้ เพราะ Internet Speed เหลือ ๆ แต่ก็จะแนะนำเอาไว้เป็นทางเลือกของใครหลาย ๆ คนที่ทำระบบครับ มันมีอะไรที่ดีอยู่อีกมากทำ Access Control ก็ง่าย กลับมาก่อน ๆ เดี๋ยวจะยาว 555+ ผมจะให้ไปเรียกใช้ DNS ของ Google ซึ่งก็คือ 8.8.8.8 และ 8.8.4.4 เลยก็ได้นะ แต่ในที่นี้ผมจะใช้ผ่าน Proxy เพื่อทดสอบ

ไปที่ Internet Options > Tab Connections > Internet Properties ที่หัวข้อ Proxy server ใส่่ IP และ Port ของ Proxy Server เลยครับ

เปิด Web browser ขึ้นมา จะ IE จะChrome ก็เปิดขึ้นมาเลยครับ ฮ่า ๆแล้ว เข้าหน้าเว็บอะไรก็ได้ หรือ Google.com ก็ได้ แล้วมันจะปรากฎ Popup ขึ้นมาให้เรา Sign in Username & Password ที่เราทำการสร้างไปก่อนหน้านี้แล้ว คือ user1

แค่นี้เราก็สามารถเข้า Internet ได้แล้วครับ

ทีนี้ การเช็ค Log การเข้าใช้งานของ User
โดยพิมพ์ grep ระบุชื่อ User ที่เราต้องการแสดง Log แล้วตามด้วย Path dirctory access.log ตามแบบข้างล้างนี้
[root@centos-vm ~]# grep user1 /var/log/squid/access.log
1565264105.533 2090 192.168.1.251 TCP_TUNNEL/200 4933 CONNECT accounts.google.com:443 user1 HIER_DIRECT/172.217.24.173 -
1565264105.533 1838 192.168.1.251 TCP_TUNNEL/200 4440 CONNECT adservice.google.co.th:443 user1 HIER_DIRECT/172.217.24.162 -
1565264105.533 2450 192.168.1.251 TCP_TUNNEL/200 69720 CONNECT www.google.com:443 user1 HIER_DIRECT/172.217.24.164 -
1565264105.533 1709 192.168.1.251 TCP_TUNNEL/200 4150 CONNECT googleads.g.doubleclick.net:443 user1 HIER_DIRECT/172.217.31.34 -
1565264105.533 1975 192.168.1.251 TCP_TUNNEL/200 5149 CONNECT adservice.google.com:443 user1 HIER_DIRECT/172.217.24.162 -
1565264115.540 1834 192.168.1.251 TCP_TUNNEL/200 4750 CONNECT adservice.google.com:443 user1 HIER_DIRECT/172.217.24.162 -
1565264115.540 2298 192.168.1.251 TCP_TUNNEL/200 69578 CONNECT www.google.com:443 user1 HIER_DIRECT/172.217.24.164 -
1565265738.904 240503 192.168.1.251 TCP_TUNNEL/200 69614 CONNECT www.google.com:443 user1 HIER_DIRECT/216.58.221.196 -
1565265739.033 240153 192.168.1.251 TCP_TUNNEL/200 4806 CONNECT adservice.google.com:443 user1 HIER_DIRECT/172.217.166.130 -
1565265872.028 240138 192.168.1.251 TCP_TUNNEL/200 4974 CONNECT accounts.google.com:443 user1 HIER_DIRECT/172.217.166.141 -
1565265872.169 240152 192.168.1.251 TCP_TUNNEL/200 5374 CONNECT google.com:443 user1 HIER_DIRECT/216.58.203.78 -
1565266337.532 240188 192.168.1.251 TCP_TUNNEL/200 5219 CONNECT clients4.google.com:443 user1 HIER_DIRECT/216.58.196.46 -
เสร็จแล้วครับ สำหรับการ Config Proxy server ผ่าน โปรแกรม squid และการทำ Authentication Username & Pssword สำหรับการเข้าใช้งาน Internet อาจจะยาวหน่อย แต่ก็อาจจะมีประโยชน์กับใครหลาย ๆ คน หรือน้อง ๆ ที่เพิ่งจะเริ่มทำงานด้าน IT กัน เพียงแต่ต้องมีความรู้พื้นฐานเกี่ยวกับ Network อยู่พอสมควรนะครับ ทำตามจะได้ไม่งงเป็นไก่ตาแตก จะได้รู้่ว่ามันคืออะไร เป็นยังไง
ว่าง ๆ ถ้ามีเวลา จะมาแนะนำวิธีการทำ Access Control ต่าง ๆ ใน squid ครับ..

ความคิดเห็น
แสดงความคิดเห็น